Top 10 Steps to Organize your Closet

Top 10 Steps to Organize your Closet Do you look in your closet and think you have nothing to wear? Is it difficult to find what you’re looking for? Do you wear the same 5 outfits every week? If you answered yes to any of these questions, maybe your closet could use a little organizing to help inspire your outfits. Here are some options to consider: Depending on the space you have available, you may only be able to have current seasonal clothing in your closet at a time. If this is the case, storage bins are a good option for storing the out of season and special occasion items. Storage bins https://bestbeautyhacks.com/storagebins These keep clothes dust free and easy to access. These storage bins can also be used in the kitchen as a pantry, laundry room, kids rooms, etc Clothes hangers https://bestbeautyhacks.com/velvethangers do you have a mix of hangers in your closet? Plastic hangers from college, wire hangers from the dry cleaners, or a random wood hanger here and there? Having all the same kind of hangers is an inexpensive way to add some organization with a uniform look. These velvet hangers also take up less room and clothes are less likely to slip off the hanger. Once you have all your hangers uniform, then you can organize your clothing in a way that makes sense to you – by color, sleeve length, etc. this will help you be able to create new outfits by having all your options together. Pant/skirt hangers https://bestbeautyhacks.com/velvetcliphangers don’t forget matching hangers for your pants, slacks and skirts! Boot hangers for tall boots https://bestbeautyhacks.com/boothangers Do your boots wind up in a pile in the corner of your closet? These hangers work great to store your boots properly so they don’t get scuffed or damaged. Shoe polish https://bestbeautyhacks.com/shoepolish speaking of boots, are yours looking a bit worn out? It’s a good idea to polish and condition your boots and shoes once a year to help them look new and last longer. Doing this will also allow you to see if heels are broken or soles are wearing down so you can have them fixed. Jewelry organizer https://bestbeautyhacks.com/jewelryorganizer Is your jewelry a tangled mess, or still in the boxes that they came in, so you forget what you have and rarely wear it? If you have an extra drawer or shelf, a jewelry organizer is really helpful to see everything you have at a glance. This modular option allows you to customize your organizer based on the types of jewelry you have and the space you have available. Laundry bags https://bestbeautyhacks.com/laundrybags I used to spend a couple hours every Saturday hand washing all my family’s dress shirts, sweaters, hand washables and delicates. These bags are an inexpensive way to wash your delicates and hand washables so they last longer and saves you time. Drawer organizing If you haven’t tried Marie Kondo’s method, watch some of her you tubes so you can see if any of her methods would be useful in your specific situation. I love her drawer organizing for t-shirts, it takes up less room and you can see everything at a glance. Marie Kondo book: https://bestbeautyhacks.com/Mariekondo Laundry hamper https://bestbeautyhacks.com/laundryhamper Laundry baskets are useful, but not very aesthetically pleasing. This option looks better with more functionality to hang garments, added storage and wheels to easily move without strain. Pill remover https://bestbeautyhacks.com/pillremover Have you noticed the fabric pilling on your favorite sweater or jacket? Instead of donating or discarding the item, consider using a pill remover. It’s battery operated and has a blade that cuts the pills off, leaving the fabric smooth again without damage. You can use it on heavy fabric and delicate fabric too. Pay attention to what is causing the pilling so you can avoid it, it may not be just wear and tear. I’ve had it happen from a special occasion hand bag with a rough surface that pilled up a gorgeous wool coat and a chunky necklace that pilled a smooth ponte dress. This little tool has made so many of my jackets, sweaters and dresses look new again! Bonus tip: Lint roller https://bestbeautyhacks.com/lintroller You might not think of a lint roller if you don’t have pets, but it’s a good practice to run a lint roller over your jackets or coats after you wear them to get any loose hair or lint off so it looks fresh and clean the next time you reach for it. If you follow each of these organizational ideas, it will be easy to always keep your closet organized which will inspire you to wear more of your wardrobe. A special thank you to my beautiful friend Shan, who is my go-to for closet inspo Was this article helpful? What are your favorite organizing tips? *Disclaimer: This post is not intended to provide diagnosis, treatment or medical advice. Content provided is for information purposes only Please consult with a physician or other healthcare professional regarding any medical or skin related diagnosis or treatment options. The statements made about specific products throughout this blog are not to diagnose, treat, cure or prevent disease. It is important that you check labels to determine if a product is right for you. Before starting any treatment at home consult a health care or skin care professional to determine if it’s right for you. *Disclosure: some links may be affiliate links where I may get a small commission at no additional cost to you.
DIY: Chemical Peel

DIY: Chemical Peel Fall brings the start of peel season! If you’ve had peels done professionally, you know the best time to start a chemical peel regimen is once summer is over when people are exposed to lots of sun. This is because a chemical peel makes your skin more sensitive to sunlight, burning and a host of other side effects. Have you tried doing a chemical peel at home? I am a big fan of chemical peels and have had several peels in a professional setting, they are so great for giving you an extra boost of smoother, brighter more even tone skin. But I was really hesitant to do this on myself. It’s acid, after all. Why should you consider doing a chemical peel at home? Chemical peels are really effective, but can be expensive when done professionally on a regular basis. But what are the benefits of chemical peels? Here are a few, significant benefits: Resurfacing for smoother, brighter, clearer complexion Manage acne Reduce acne scarring Treat hyper pigmentation, age spots, sun damage anti-aging by reducing fine lines and wrinkles help with cell turnover Wondering what areas can you treat with a chemical peel? You might be surprised! Not only can you treat your face, but you can treat your eye lids (yes!), lips and ALL parts of the body (underarm and intimate areas!) as well. Chemical peels work on all skin types, but you should not do a chemical peel if you have any of the following conditions: Broken skin Infection or disease Have an active cold sore Have a sunburn Are pregnant or nursing Have used Accutane in the last 6 months Currently have psoriasis, dermatitis or rosacea Also, if you use vitamin A (retin-A, retinoid) discontinue 2 weeks prior to a peel. Instead of trying to detail out all the information on how to do a chemical peel from home given all the specific needs, I’m going to point you to an online company that specializes in providing product and instruction for chemical peels at home. The company is Platinum Skin Care. Their peels are professional grade and pure at the percentages, not blended. Platinum Skin Care is so knowledgeable and thorough with their content. They have many different types of peels for different skin conditions, a quiz to determine what kind of peel you would benefit from based on your needs, step by step videos, live Q&As and their own product line to support the pre and post treatment of your skin. You’ll have the confidence to do a chemical peel on yourself in the comfort of your own home in no time. You can check them out here: PlatinumSkinCare.com Was this article helpful? *Disclaimer: This post is not intended to provide diagnosis, treatment or medical advice. Content provided is for information purposes only. Please consult with a physician or other healthcare professional regarding any medical or skin related diagnosis or treatment options. The statements made about specific products throughout this blog are not to diagnose, treat, cure or prevent disease. It is important that you check labels to determine if a product is right for you. Before starting any treatment at home consult a health care or skin care professional to determine if it’s right for you. *Disclosure: some links may be affiliate links where I may get a small commission at no additional cost to you.
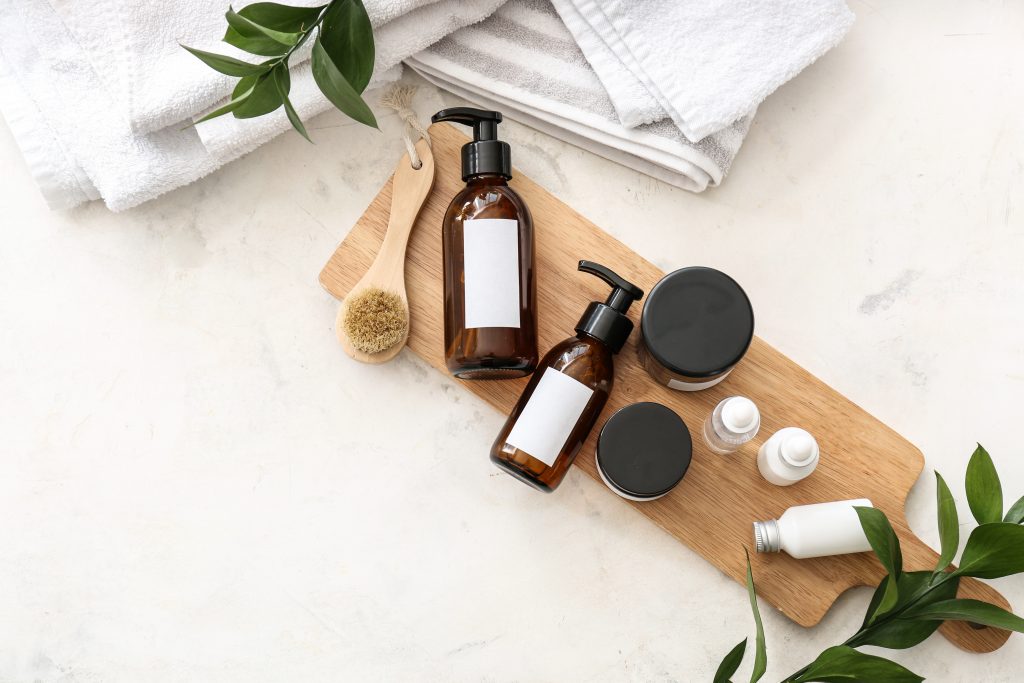
How to: Dry Brushing Protocol

How to: Dry Brushing Protocol The secret to smooth, healthy skin! This blog is written with generally healthy people in mind. If you have any health concerns, skin lesions, lymphedema or other similar concerns, consider consulting with a professional that specializes in those concerns before introducing dry brushing into your routine. The most common way of dry brushing that you see everywhere, has you start brushing from the feet and work your way upward toward the heart. But after researching this further, this method may not be the best procedure as there could be blocks in the lymphatic system further up that would compound if you are brushing more fluids to the area. Because of this, the following protocol works with the lymphatic system to allow for proper lymphatic drainage. Benefits of dry brushing While this protocol targets the lymphatic system, there are several other significant benefits of dry brushing: Exfoliates skin Stimulates collagen production Unclogs pores Increase blood circulation Increase skin smoothness Reduce the appearance of cellulite Detoxes skin and eliminates toxins from your body Promotes lymphatic drainage Protocol Let’s begin! Start with dry, bare skin without any lotion or oils on it. Use a natural, soft bristled brush. It’s helpful to have a hand held brush and another with a long handle to reach your back. This is a good option: https://bestbeautyhacks.com/drybrushes Think of your body in 4 sections. Each leg is a section up to your waist, and each arm is a section from your abdomen up to your collar bone. Start with your abdomen, where the lymph nodes are deeper to stimulate. Brush or massage your abdomen in a circular motion 3-5 times. Then begin with the lower sections. Instead of beginning at the foot, start at the thigh/upper leg. Brush with short, gentle but firm strokes upward toward your groin, 3 to 5 times. Be sure to brush all sides of the upper leg, brushing the back of the leg to the front where the lymph glands are. Then brush all sides of the knee, brushing upward. Be sure to get the back of the knee as there are lymph glands behind the knee. Continue down the leg to the calf, brushing upward in short, gentle strokes. Then brush the feet, including the toes and the sole of the foot. Once you’ve finished brushing the foot and ankle, work your way back up the calf, knee, thigh and waist to the groin. Do the same to the other leg. Now you can work on the upper sections. Brushing upward from your abdomen on one side up toward your armpit, and brushing your back by pulling the brush from your spine around your side to the front of your body. Do this for your torso and shoulder, front and back – brushing toward the armpit. Then brush the arm the same way you brushed the leg, starting with the upper arm and brushing all sides toward the armpit. Next, brush your elbow, forearm, hands and fingers. Once you are done brushing your hand, work your way back up your arm brushing each section of your arm to your armpit. And you’re done! Be very gentle when you first start dry brushing, as your skin may seem sensitive to it. As you continue to dry brush, you’ll be able to use firmer pressure. Adjust to your skin’s responses, as it shouldn’t be painful. Contraindications of dry brushing Do not dry brush over areas of the skin with the following concerns: Broken skin or lesions Inflammation Infection Cellulitis Skin cancer If you get nauseous while dry brushing or shortly after dry brushing, this is common and due to the lymphatic drainage. Drink plenty of water to flush your system. FAQs How often should you dry brush? Dry brushing can be done daily if you’re gentle, but generally 2-3 times a week is sufficient. When is the best time to dry brush? In the morning, before a shower as it stimulates blood circulation and invigorates your body. Do I need to shower after I dry brush? No, you don’t have to shower after you dry brush but it helps remove all the dry skin you just exfoliated. How soon before you see results? You’ll notice softer skin that is less dry and itchy in the first few days to two weeks. Can you dry brush breasts? Absolutely! Toxins get trapped in the breast tissue from wearing bras. Dry brushing breasts will promote lymphatic drainage and prevent blockages in the lymph glands around the breasts. Are there any side effects of dry brushing? Your skin can become irritated or inflamed if you are dry brushing too hard or too often. You can also get nauseous while dry brushing or shortly after dry brushing. This is common and due to the lymphatic drainage. Drink plenty of water to flush your system. For more information on dry brushing for lymphatic drainage, check out Cancer Rehab PT on Youtube. Kelly is a wealth of valuable information on this topic. Was this article helpful? Please share your tips for dry brushing! *Disclaimer: This post is not intended to provide diagnosis, treatment or medical advice. Content provided is for information purposes only. Please consult with a physician or other healthcare professional regarding any medical or skin related diagnosis or treatment options. The statements made about specific products throughout this blog are not to diagnose, treat, cure or prevent disease. It is important that you check labels to determine if a product is right for you. Before starting any treatment at home consult a health care or skin care professional to determine if it’s right for you. *Disclosure: some links may be affiliate links where I may get a small commission at no additional cost to you.
Clinical Grade DIY Products from Qure Skincare

Clinical Grade DIY Products from Qure In honor of Skincare Awareness Month, I would like to share Qure Skincare with you. Qure is a clinical grade skincare that can be done in the comfort of your own home. This means that you get the same results at home as you would in a clinic by this science backed, dermatologist approved product line. Saving you time and (a lot) of money. They have a really innovative and effective product line, with complete DIY skin therapy solutions backed by clinical evidence. Their products and technologies are designed to deliver the same results as professional treatments, but in the comfort of your own home. Light Therapy Mask Yes, there are a lot of light therapy masks out there to choose from. But this is one of the few that is FDA- approved, has all 5 beneficial light therapies and the only mask that comes with an app to customize your treatment. Light therapies treat sagging skin, fine lines and wrinkles, skin tone, acne and inflammation. All in One Serum This product is packed with so many great ingredients that for many are separate steps in their skincare routine. This not only simplifies your routine, but saves you money on all the individual products. Includes Argireline, Retinol, peptides, niacinamide, Vitamin C, Vitamin E and Ferulic Acid. Micro Infusion System The Micro Infusion System is similar to a micrneedling treatment, except the stamp uses hollow needles so the serum goes directly into the skin. By creating a controlled trauma to the skin with the needle stamp, it sends a signal for your body to increase collagen production. And the hollow needles allow the serum to infuse into the skin, increasing penetration by 300%. They have a special offer going on for the month of September, in honor of Skincare Awareness Month. Micro Infusion System For more information on Qure, please check out their site: Qure Skincare I hope you agree, this is a really exciting skincare line! Please let me know if you’ve tried Qure and what your thoughts are! Was this article helpful? *Disclaimer: This post is not intended to provide diagnosis, treatment or medical advice. Content provided is for information purposes only Please consult with a physician or other healthcare professional regarding any medical or skin related diagnosis or treatment options. The statements made about specific products throughout this blog are not to diagnose, treat, cure or prevent disease. It is important that you check labels to determine if a product is right for you. Before starting any treatment at home consult a health care or skin care professional to determine if it’s right for you. *Disclosure: some links may be affiliate links where I may get a small commission at no additional cost to you.
Summer edit – car organization ideas from Amazon

Summer edit: car organization ideas from Amazon Summer is here! Are ready for a busy season of outdoor activities? While everyone is busy organizing your kitchens, closets and garages – what about your car? With road trip season right around the corner, it’s the perfect time to organize your car. I mean a well organized car where everything has it’s place, within reach. Not shoved under the passenger seat, toppling around in the back seat or rolling around in the trunk. Here are some ideas to help you create a zen environment in your car, for those road trips ahead. Here are 18 ideas to help organize your car: Magnetic sunglass holder https://amzn.to/3V6phKc Phone holder – https://amzn.to/3AmTdIg Cup holder expander https://amzn.to/3N6CiBu Tissue holder – https://amzn.to/3L33RsM Portable power plug in – https://amzn.to/3H5crWJ Trash disposal options: Portable trash can – https://amzn.to/41J8z5O Juststop mini trash can – https://amzn.to/3Hbht3V Larger trash can – https://amzn.to/40ytuHF Front seat gap filler – https://amzn.to/3LpfNqf Backseat organizer – https://amzn.to/3mU6kh7 Purse/grocery bag hooks – https://amzn.to/40xsB21 Trunk organizer options: Trunk organizer – https://amzn.to/3oCXbKj Hanging trunk organizer – https://amzn.to/3oz8zaa Car Trunk Organizer with Cooler – https://amzn.to/3orMEBu Large Trunk Organizer With Built-in Leakproof Cooler Bag – https://amzn.to/3AmVCmn Portable vacuum – https://amzn.to/3L0plXh Jump start kit – https://amzn.to/3V1ihOD Car emergency kit – https://amzn.to/3mZS4n1 car emergency thermal blanket – https://amzn.to/41SHDAf car waterproof blanket – https://amzn.to/41vxrOF life straw – https://amzn.to/3KUDgOq solar power bank – https://amzn.to/3H6CrAR self defense multi functional flashlight – https://amzn.to/3H70nV4 emergency food and water kit – https://amzn.to/43T7Twq What are your favorite tips for organizing? Was this article helpful? Please leave a comment, we love to hear from you!
Hand Sanitizer Recipe
Hand Sanitizer Recipe It’s now common practice for just about everyone to have a bottle of hand sanitizer within reach, at all times. But have you ever bought a bottle of hand sanitizer only to use it and find the smell so offensive you can’t wash it off quick enough, and you end up smelling it all day even though you’ve washed it? Or it leaves a weird residue and your hands end up feeling dirty from it? And then there’s the empty plastic bottles that we end up throwing out, only to go buy more bottles. Hand sanitizer is very convenient and multi-purpose; I’ve used it to clean surfaces, kill the sting and reduce the duration of bug bites, and even on minor cuts or scrapes to kill germs. Keep in mind that hand sanitizer can also strip your skin of moisture and compromise your skin barrier if used too much, so use soap instead of hand sanitizer whenever possible. If you’re looking for a DIY solution to hand sanitizer, you may like this recipe. It has a base of aloe vera for soothing and healing, and you can customize it to your liking with essential oils. DIY Hand Sanitizer Recipe 2/3c Isopropyl alcohol 99% 1/3 c Aloe Vera 8-10 drops Essential Oil Mix all together in a bowl. Using a funnel, pour into reusable pump bottles. Makes one cup. *Disclosure: some links may be affiliate links where I may get a small commission at no additional cost to you. Was this article helpful?
All Purpose Cleaner Recipe

All Purpose Cleaner Recipe In case you weren’t aware, we are bombarded with toxins on a daily basis in ways you may not realize. This exposure to toxins ends up accumulating in your liver and other vital organs, wreaking havoc on our health. Unfortunately, there’s no way to completely eliminate toxins because they are literally everywhere in the environment, but there are steps you can take to reduce and remove some of the toxins in your life depending on what’s important to you. In my quest to minimize my family’s exposure to toxic chemicals, I came across this DIY recipe for an all purpose cleaner that is surprisingly effective. I’ve cleaned windows without leaving streaks, and grout to it’s original color, and everything in between. It even cleans toilets. And, there are little to no fumes. It’s also very cost effective too, considering you won’t need to buy separate cleaners anymore. All Purpose Cleaner Recipe 2 Qt water ½ c ammonia 1 pint rubbing alcohol 1t Dawn dish washing liquid Mix together. Pour into spray bottle. *Disclosure: some links may be affiliate links where I may get a small commission at no additional cost to you. Was this article helpful?